Tuesday 25 February 2014

Roast Chicken: The Essentials

Who doesn't like a good roast chicken; juicy, succulent, savoury. Being able to produce a great roast chicken isn't hard, but if you take some care and put in a little effort the result can be delicious. Roast chicken should be on everyones Essential Can Cook List. 
First the chicken, you get what you pay for when it comes to chicken. If you spend more money and get an organic, free range chicken (points for local), it's gonna taste a lot better. Whatever chicken you buy, you have to give it a little love. 
First salt and pepper everywhere, inside and out. Then fill the cavity with something aromatic. Tonight I stuffed my bird with ginger, cilantro and garlic, but the possibilities are endless. Carrots, celery, onion, parsley, lemon, chilies, lime, orange... things that give off some aroma. Two or three things should do fine, just don't overstuff. You want the hot air to be able to circulate inside your bird. 
Then rub with fat. Either butter or oil (veg, olive, canola, something light) smeared on the skin. If you wanna get fancy, put some softened butter under the skin. Wanna get crazy, add some herbs to the butter.
Next you should tie up your bird. Or.... don't. I've done my bird super tied up, i've just tied the legs, I have lived life on the edge and let it all hang out. If you tie the chicken it will be a bit better, but if you don't it will still be good.

Now get a few veggies. Usually 2 carrots, 3 celery stalks, an onion and some garlic; peel, slice. Put everything in your roasting pan with some oil salt and pepper. Place your baby on top.
I roast at 350°F. Some people might say that is too low. I find it results in a juicier bird. If you want to roast higher, 375°-400°F, go for it. 
How long do you cook it for? Till it's done. Chicken is done at 165°F. Do I have a thermometer? No. How do I know it's done? Well, it looks done. The skin is brown, the juices run clear, you can pull the leg away easily. 
Last night we had Roast Chicken, Kale and Cheesy Gnocchi.

See, not hard and delicious delicious results.

Pan gravy will have to wait for another day. 

Follow eatitmartha on instagram: 

Sunday 23 February 2014

The Willistead

I have been wanting to try The Willistead for a long time, I love the farm to table head to tail approach. I finally got the chance last night with my good friend. And let me tell you I was not disappointed. 

We were late for our reservation, and even though the restaurant was very busy, we were sat right away. We sat ordered a bottle of great Riesling. We chatted, ordered food. The atmosphere was awesome. Great music. We waited about 45 minutes for food, but it was worth it. 
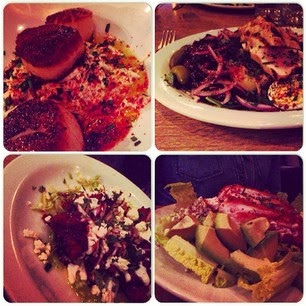
We started with seared scallops and cauliflower fritters. Both awesome. Scallops were perfectly cooked with apple slaw. Fritters were deep fried, vegetable, deliciousness. With a salad including radishes and feta around it to balance the rich fritter. 
My friend had the Cobb Salad. Just right hard/not to hard boiled eggs, in house smoked bacon, blue cheese, avocado, and and excellent piece of moist chicken. I had the Niçoise Salad; green beans, tomatoes, variety of olives, red onion tossed with parsley, hard/not too hard boiled egg, potatoes that were marinated in vinaigrette, and a piece of tuna that melted in my mouth. Everything was perfectly cooked and delicious.
I would highly recommend this place. Do yourself a favour and make a reservation if you don't want to wait.

Homemade sesame seed bagels


Hello friends,
This is my first real blog post...ever. I hope everyone likes it. I have been thinking about this for a long time. I am obsessed with cooking, and well, chef is not really in the cards for me. But I want to share my love of food with others. I want to show people that real food not hard, and so worth a little effort.
You will also be seeing a little of  the other stuff I like. Crafting, gardening, my family, perhaps even an opinion or two.

This recipe started as a recipe swap with a good friend. See I really want to be good at making bread. Whenever I make it though I feel like it isn't as good as it could be because I do all my kneading by hand. So that's where my wonderful friend Kristen comes in. She also loves to cooks and she has a mixer. I love cooking buddies. Anyways she said they were delicious so I gave them a try. 

It takes a little bit of time and effort with all the resting and boiling and baking, but its very worth it. Even the kneading wasn't too bad.
They were just the way a bagel should be crunchy and toothsome on the outside and soft and chewy on the inside. I made mine sesame seed with a little sprinkle of coarse salt, I'm sure any topping would be great; poppy seeds, garlic salt,  chili powder, cinnamon sugar. I want to try flavoring the dough next time, the recipe was so easy flavoring the dough shouldn't be too hard.

The recipe comes from the Tasty Kitchen. I really like this blog I have made a few recipes from this site and they are always awesome.
Ingredients 
1 1/2 tsp yeast
1/2 T sugar
2/3 cup warm water + extra
1/2 T vegetable oil
3/4 tsp salt
2 cups flour


Instructions
  • In the mixer bowl combine water, sugar and yeast. Let sit for around 5 minutes.
  • Add flour, veg oil and salt. Mix (dough hook for machines, or by hand) until dough is elasticy. While you are kneading you may feel like you need more water. Add it little by little, remember you can always add more but you can't take away.
  • Let rise for 30-45 minutes.
  • Turn out dough onto a floured surface and knead for a few minutes. Cut dough into 6. Roll into snakes then form into circles, a little water will help the ends adhere. 
  • Rise on a floured board for 20-30 minutes.
  • Preheat oven to 425ºF
  • Boil 6 cups of salted water, place 2-3 bagels in the water. Boil for one minute and flip and boil for one more minute. Place on paper towel to absorb moisture.
  • Bake for 18 minutes, turning after 10 minutes
Note: Substitute 1/2 cup wheat flour and 1 1/2 cup all-purpose flour for a wheat variation